SCALING UP
Scaling up or enlarging is a technique artists have used over the centuries, where the finished painting is much bigger than the subject matter. There are numerous examples including huge portraits and still life pictures where the original subject has been enlarged in the finished picture. Traditionally artists would have used a grid method or camera obscura to help them. Now we have the benefit of computers, tablets and photocopiers to do it for us, which makes the process much easier. If you are computer minded a very useful tool for scaling up (which can be found via a google search) is the "arttutor grid drawing tool"
This tutorial is an exercise using old fashioned pen and paper methods for you to try out and have some fun with. The text should be followed with reference to the accompanying 2 photographs (below).
You need
Large sheet of paper
An old magazine or post card
Scissors
Glue
Your choice of medium ( I used Gouache)
Drawing pencil
Ruler
Method
Enjoy the processes and HAVE FUN
SCALING UP
Scaling up or enlarging is a technique artists have used over the centuries, where the finished painting is much bigger than the subject matter. There are numerous examples including huge portraits and still life pictures where the original subject has been enlarged in the finished picture. Traditionally artists would have used a grid method or camera obscura to help them. Now we have the benefit of computers, tablets and photocopiers to do it for us, which makes the process much easier. If you are computer minded a very useful tool for scaling up (which can be found via a google search) is the "arttutor grid drawing tool"
This tutorial is an exercise using old fashioned pen and paper methods for you to try out and have some fun with. The text should be followed with reference to the accompanying 2 photographs (below).
You need
Large sheet of paper
An old magazine or post card
Scissors
Glue
Your choice of medium ( I used Gouache)
Drawing pencil
Ruler
Method
- Cut a 6cm square from a magazine or card and glue it down on to your large sheet of plain paper.
- Mark every 2cms along the edges. Draw lines across and down with a ruler to make a 2cm grid.
- Draw an accurate 18cm square on your paper nearby and measure and mark every 6cms. Mark the edges with 1,2,3 and A, B, C as with small square. Lightly draw the grid in using pencil.
- Working on one square at a time use the grid lines to help you transfer the main lines and areas of colour from the magazine image to the large grid. It can help to draw over the main lines on the magazine using a marker pen to identify the edges of the shapes. Don’t try to put in all the details.
- Colour in the large areas on your drawing using any medium (I used gouache) No need to use exact colouring, this is an exercise.
- Small details can be overpainted at the end.
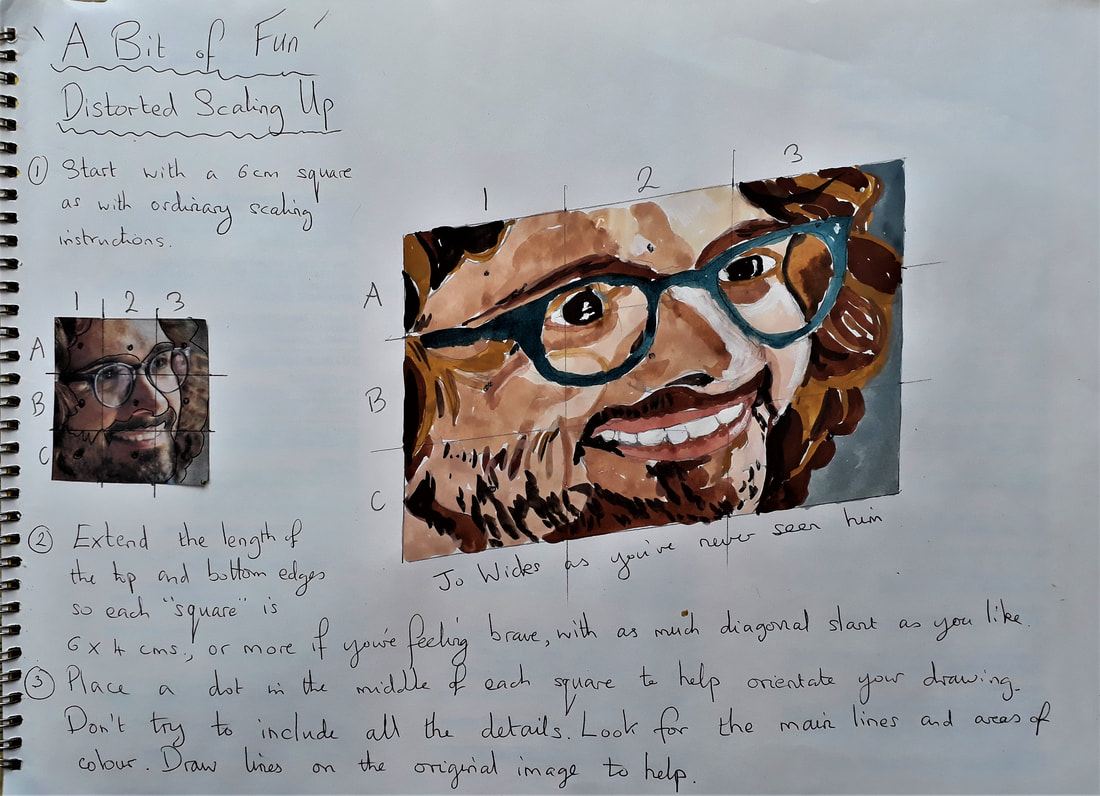
- The exercise can also be done by dividing the picture into rectangles which distorts the image in interesting ways.
- You could try the extension activity in picture 2 where the image becomes deliberately distorted.
Enjoy the processes and HAVE FUN

© images are the copyright of the individual artists and are not to be used without their permission.
